Tutorial
Using WordPress Page Templates
WordPress Page Templates are used to display page content within a unique layout and/or add unique functionality. All Organic Themes include a variety of Page Templates. For your convenience, we have outlined the usage for some common Page Templates found within our themes:
- Home — Displays content in a unique home page layout as in the theme demo. Also, the Home template often requires additional setup within the Customizer.
- Full Width — Display a full width page without any sidebars.
- Blog — Display posts from a category selected within the theme options.
- Portfolio & Testimonials — Display posts with Featured Images from a category or the Jetpack portfolio custom post type.
- Landing — Displays a page with no header or footer. Generally used as a Coming Soon or Maintenance page.
- Organic Custom — The page template supplied by the Builder Widgets plugin. It allows you to build custom page designs using widgets.
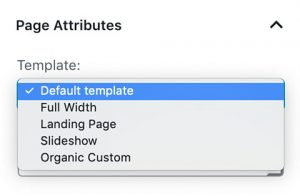
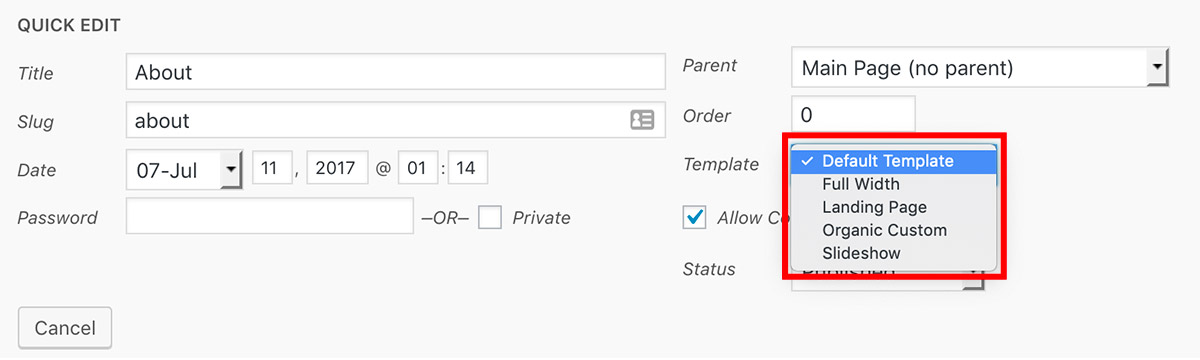
Page Templates are applied within the Page Attributes section of the page editor. Additionally, Templates can also be applied within the Quick Edit options as seen below.
There are a variety of Page Templates included with Organic Themes, and some themes have more than others. Below, we will provide instructions for the setup of common Page Templates.
Full Width Page Template
- Navigate to Pages > Add New to create a new page.
- Add your page title and content.
- Within the Page Attributes section of the Document settings, choose the “Full Width” template.
- Publish the page.
- Navigate to Appearance > Menus to add the page to your custom menu.
Blog Page Template
Blog pages are created one of two ways within Organic Themes, depending on your particular theme and version. Either by setting a posts page within the Appearance > Customize > Homepage Settings as described in our Quick Start Guide, or by using a provided page template as described below:
- Navigate to Pages > Add New to create a new page.
- Add your page title.
- Within the Page Attributes section of the Document settings, choose the “Blog” template.
- Publish the page.
- Navigate to Appearance > Customizer > Theme Options to configure your blog page. You may need to select a category for displaying a particular group of posts on your blog.
- Publish the changes.
- Navigate to Appearance > Menus to add the page to your custom menu.
Portfolio Page Template
- Navigate to Pages > Add New to create a new page.
- Add your page title.
- Within the Page Attributes section of the Document settings, choose the “Portfolio” template.
- Publish the page.
- Navigate to Appearance > Customizer > Theme Options to configure your portfolio page.
- Publish the changes.
- Navigate to Appearance > Menus to add the page to your custom menu.
Note: For themes with a filterable portfolio, the filters are sub-categories of the category selected within the theme options. For example, you could set a category such as ‘Portfolio’, then create sub-categories as filter options: ‘Photography’, ‘Illustration’, ‘Painting’, and so forth.
Jetpack: Many of our themes are compatible with the Jetpack portfolio post type. If the Jetpack plugin is active on your site, portfolio posts (Projects) will display on the “Portfolio” Page Template.
Testimonials Page Template
- Navigate to Pages > Add New to create a new page.
- Add your page title.
- Within the Page Attributes section of the Document settings, choose the “Testimonials” template.
- Publish the page.
- Navigate to Appearance > Customizer > Theme Options to configure your testimonial page.
- Publish the changes.
- Navigate to Appearance > Menus to add the page to your custom menu.
Jetpack: Many of our themes are compatible with the Jetpack testimonial post type. If the Jetpack plugin is active on your site, testimonials will display on the “Testimonials” Page Template.
Slideshow Page Template
- Navigate to Pages > Add New to create a new page.
- Add your page title.
- Within the Page Attributes section of the Document settings, choose the “Slideshow” template.
- Add a WordPress image gallery within the page content.
- Publish the page.
Note: The image slideshow will be created from the first gallery added to the page content. Slideshow images will display in the same order as they appear within the gallery. However, the gallery itself will not appear within the page content — only the slideshow.
Gutenberg: If you’re using the WordPress 5.0+ Gutenberg block editor, galleries must be adding using the “Shortcode” block, and the gallery shortcode.